How to visually monitor your Meshtastic network with MeshSense
If you've ever built an autonomous network using boards like Heltec or TTGO T-Beam with Meshtastic firmware, you've likely encountered the typical observability problem. Nodes are scattered across rooftops, balconies, or backpacks, and staring at a tiny 0.96-inch screen or tapping through a mobile app just to evaluate routes quickly gets old. You want a proper dashboard with a map, signal strength graphs, and packet tracing.
The MeshSense project solves exactly this problem. It's a lightweight open-source application that connects to your Meshtastic node and renders a live map with all network parameters.
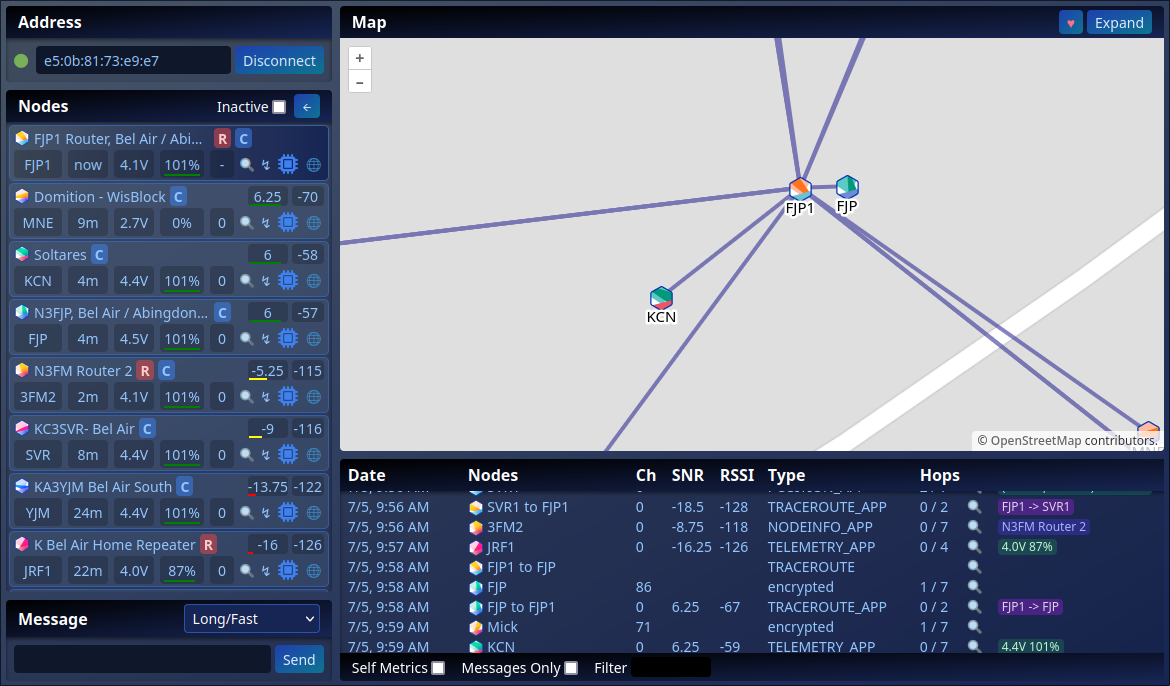
What the application can do
The main feature of MeshSense is real-time statistics collection without workarounds and complex integrations. You simply connect it to the base node via Bluetooth or regular Wi-Fi, and the interface starts gathering data from the surrounding area.
Here are the main scenarios where the dashboard saves time:
- Topology and node map. The application clearly displays which nodes are currently active, their physical GPS locations, and when they last communicated.
- Route tracing. The traceroute feature lets you instantly see how many intermediate relays a packet passed through and which path was optimal.
- Signal quality reports. You can monitor SNR and reception levels from each node to fine-tune directional antennas or identify dead zones in the city.
- Hardware status monitoring. Battery charge, temperature, and telemetry data from remote devices are displayed.
Running on a server and in headless mode
Beyond the Electron desktop version, the project runs well on single-board computers like Raspberry Pi positioned near the base radio station.
A headless mode is available for operation without a graphical interface. MeshSense starts a local web server accessible from any browser on the local network, secured with a secret key:
export ADDRESS=10.0.1.20  # IP-адрес вашей Meshtastic ноды
export PORT=5920          # Порт веб-интерфейса

ACCESS_KEY=mySecretKey ./meshsense-x86_64.AppImage --headless
When running the application on an ARM64 board without a monitor, developers suggest launching AppImage through a virtual framebuffer:
dbus-run-session xvfb-run ./meshsense-arm64.AppImage --headless \
 --disable-gpu --in-process-gpu --disable-software-rasterizer
For Debian or Ubuntu-based systems, install a couple of packages before starting AppImage: libfuse2 for the container itself to function and fonts-noto-color-emoji for icons to display properly in the interface.
Under the hood
The project architecture is split into three components: a Vite-based frontend, a Node.js API backend, and an Electron wrapper.
There's an interesting implementation detail in the code: for direct interaction with radio modules via Bluetooth, the developers built a custom module webbluetooth tied to system libdbus-1-dev and cmake. This means when building locally from source, you'll need to compile the binary binding first:
git clone --recurse-submodules https://github.com/Affirmatech/MeshSense.git
cd MeshSense

# Сборка нативной зависимости для Bluetooth
cd api/webbluetooth
npm i
npm run build:all
cd ../..

# Установка остальных пакетов
./update.mjs
For development, startup is split into two independent processes. The frontend starts on port 59, and the backend on port 59, automatically proxies unhandled routes to Vite:
# В первом терминале (UI)
cd ui
PORT=5921 npm run dev

# Во втором терминале (API)
cd api
export DEV_UI_URL=http://localhost:5921
PORT=5920 npm run dev
In the README, the authors honestly warn about a dev mode bug: when Vite hot-reloads, state event subscriptions sometimes duplicate, causing log lines to appear twice. This is fixed by simply reloading the page in the browser.
Who the project is useful for
MeshSense is a handy utility for radio amateurs, LoRa enthusiasts, and those building decentralized communication networks for hiking, cottages, or backup urban messaging. It eliminates the need to manually parse logs through a serial port or guess why a packet didn't reach the next hill over.
If you already have a home server or Raspberry Pi running with a connected LoRa node, it makes sense to add MeshSense to your startup and get a clean view of the airwaves right in front of you.
Related projects